LED Switch Web Server
The ESP32 hosts a web page with ON/OFF buttons that control two LEDs from your phone or laptop.
Project_5_ESP32_LED_Switch_Web_Server.ino, then open it in the Arduino IDE (setup: Foundation 3). Remember to set your Wi‑Fi credentials.
🎯 Objective
By the end of this project, you will:
- Connect the ESP32 to a Wi-Fi network and find the IP address it was given.
- Host a web page directly from the board, with no cloud service involved.
- Understand what an HTTP request and response actually look like as text.
- Route a request: read the URL a browser asked for and act on it.
- Control two GPIO outputs from a phone or laptop on the same network.
- Keep the page in step with the board by tracking each output's state in a variable.
1 · How an ESP32 web server works
- The ESP32 joins your Wi‑Fi and gets an IP address.
- It listens on port 80 for browsers (clients).
- Visiting
http://<ESP_IP>/returns an HTML page. - Each button links to a special URL (e.g. "ON" →
/26/on). The ESP32 sees the path, switches the LED, and re‑sends the page.
That request‑then‑respond loop is the heart of every web‑server project in this kit.
2 · Set your Wi‑Fi credentials first
Edit these two lines in the sketch with your network name and password:
const char* ssid     = "REPLACE_WITH_YOUR_SSID";
const char* password = "REPLACE_WITH_YOUR_PASSWORD";
3 · Parts Required
| Qty | Part | Notes |
|---|---|---|
| 1 | ESP32 · breadboard · jumper wires | - |
| 2 | LED | Have polarity |
| 2 | 220 Ω resistor | One per LED |
4 · Wiring the Circuit
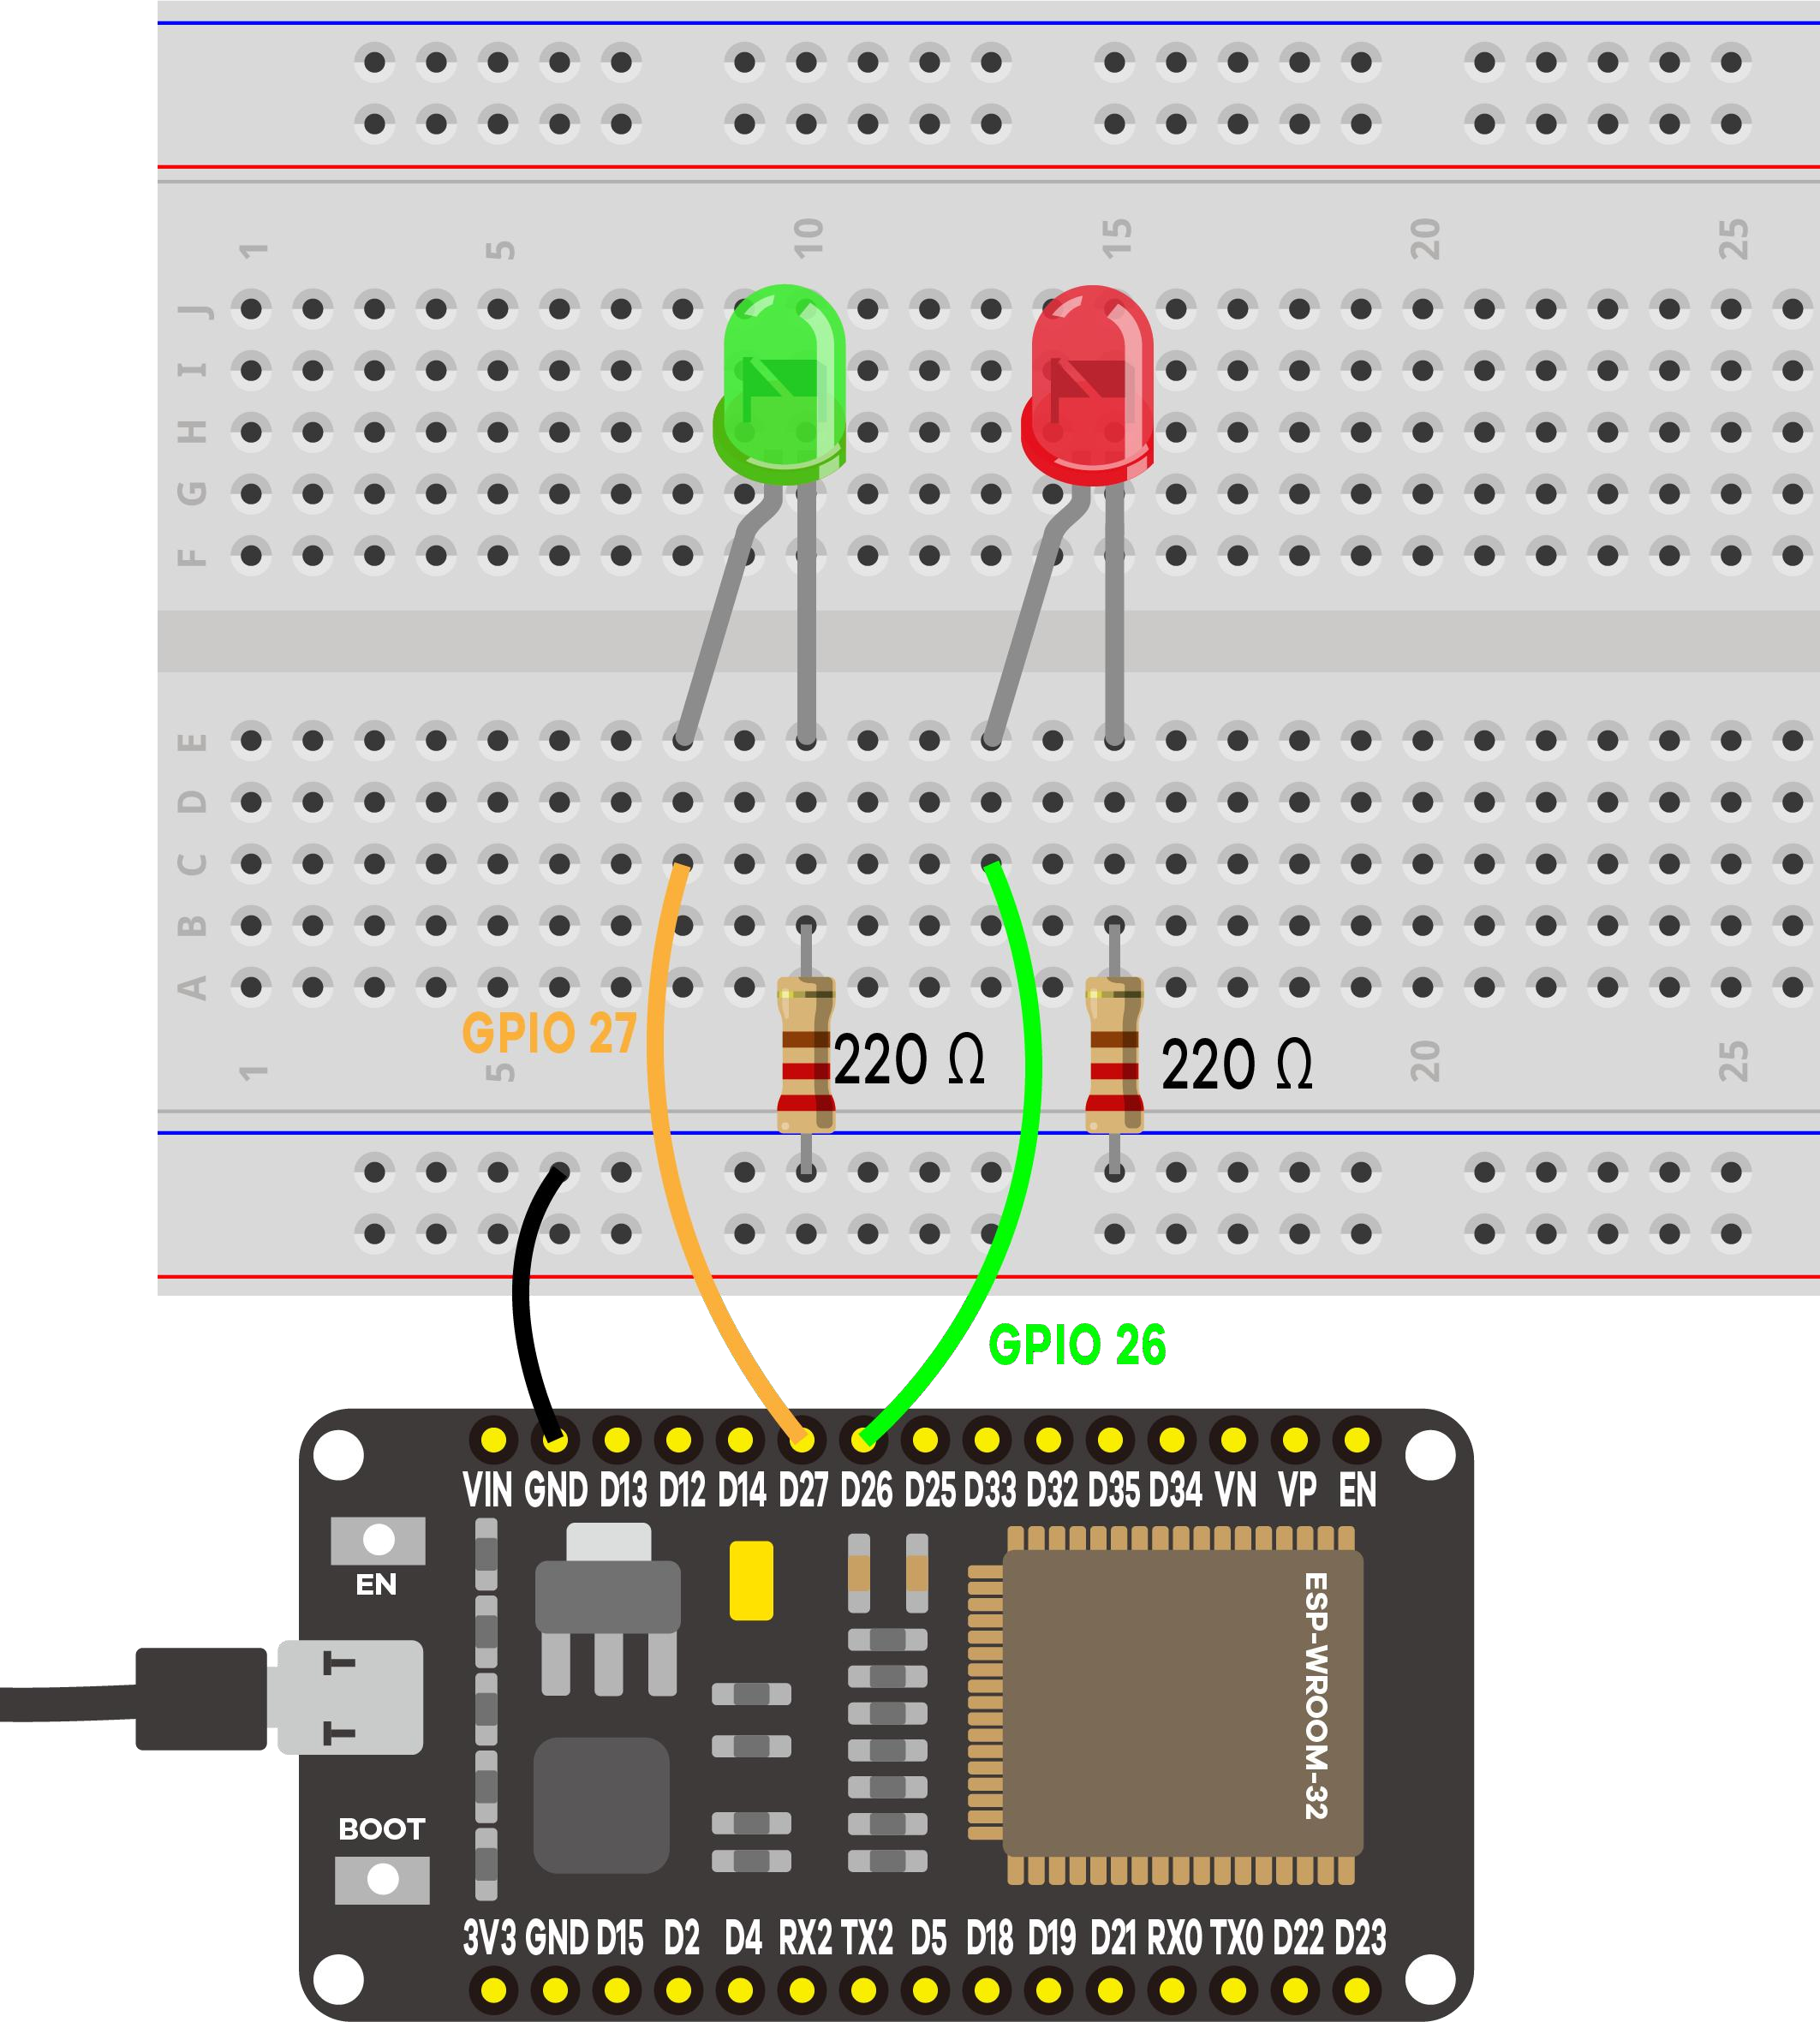
For each LED: GPIO → 220 Ω → LED anode (long leg); cathode (short leg) → GND.
5 · Find the IP & open the page
After uploading, open Serial Monitor at 115200 and press EN/RESET:
==============================================
 Project 5: ESP32 LED Switch Web Server
==============================================
LED 1 -> GPIO 26
LED 2 -> GPIO 27
Connecting to Wi-Fi: MyNetwork
....
Wi-Fi connected!
Open this address in your browser:  http://192.168.1.42
----------------------------------------------
Open that address in a browser on the same network:
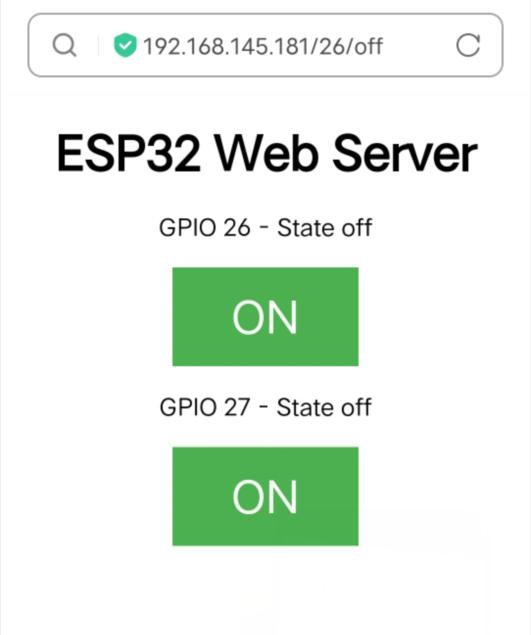
[WEB] New client connected
[WEB] LED 1 (GPIO 26) -> ON
[WEB] Client disconnected
http:// address. The raw dump is still there, commented out, for debugging.6 · Code Walkthrough: Understanding the Sketch
The longest sketch so far, but only four ideas: join Wi-Fi, wait for a browser, read which URL it asked for, and reply with a page.
Step 1: Credentials, the server object, and the state we track
#include <WiFi.h>                 // the ESP32's Wi-Fi library

const char* ssid     = "REPLACE_WITH_YOUR_SSID";
const char* password = "REPLACE_WITH_YOUR_PASSWORD";

WiFiServer server(80);            // listen on port 80, the normal HTTP port

String header;                    // the request text the browser sends us
String output26State = "off";     // what we believe each LED is doing
String output27State = "off";
WiFiServer server(80) creates a server but does not start it yet. Port 80 is the default for http://, which is why the address you type needs no :port suffix. The two state strings are the sketch's memory of what it did: the ESP32 cannot ask an LED whether it is lit.
Step 2: connecting to Wi-Fi in setup()
digitalWrite(output26, LOW);      // start with both LEDs off

WiFi.begin(ssid, password);       // start joining the network
while (WiFi.status() != WL_CONNECTED) {
  delay(500);
  Serial.print(".");              // one dot per half second
}

Serial.println(WiFi.localIP());   // the address to type in the browser
server.begin();                   // now start listening
Joining takes a few seconds, so the while loop waits for WL_CONNECTED. Each dot is one turn of that loop: if dots scroll forever, the credentials are wrong or the network is 5 GHz. WiFi.localIP() is whatever address the router handed out, usually different each time, which is why the sketch prints it rather than hard-coding it.
Step 3: loop() serves one browser request at a time
WiFiClient client = server.available();   // has a browser connected?

if (client) {
  while (client.connected() && ...) {
    if (client.available()) {             // a byte arrived
      char c = client.read();
      header += c;                        // collect the whole request

      if (c == '\n') {                    // end of a line
        if (currentLine.length() == 0) {  // a BLANK line ends it
          client.println("HTTP/1.1 200 OK");
          client.println("Content-type:text/html");
          client.println();               // blank line ends OUR header

          if (header.indexOf("GET /26/on") >= 0) {
            output26State = "on";
            digitalWrite(output26, HIGH);
          }
          // ... then send the HTML page
          break;
        } else currentLine = "";
      } else if (c != '\r') currentLine += c;
    }
  }
  header = "";
  client.stop();                          // hang up
}
The part worth slowing down for is the blank line. An HTTP request is a set of text lines followed by an empty one, which is how the browser signals "that is my whole request". The sketch watches for a \n arriving while currentLine is still empty and treats that as the cue to reply.
The buttons are ordinary links pointing at /26/on, /26/off, /27/on and /27/off. Clicking one asks the ESP32 for that URL, indexOf() spots which, and the LED is switched before the page is redrawn with its new state.
Key concepts: what each line really does
| Code | What it does |
|---|---|
WiFiServer server(80) | Creates a listener on port 80, the default for http://, so browsers connect there without being told. |
WiFi.begin(ssid, password) | Starts joining the network and returns immediately. The connection completes in the background, which is why the loop polls WiFi.status(). |
WiFi.localIP() | The address the router assigned. Type it into a browser on the same network. |
server.available() | Returns a client if a browser has connected. The "has anyone knocked?" check. |
client.read() | Pulls one byte of the request. Every byte is appended to header so the whole thing can be searched afterwards. |
currentLine.length() == 0 | Detects the blank line ending an HTTP request: the signal to start replying. |
client.println("HTTP/1.1 200 OK") | The status line, "your request worked". Content-type tells the browser to render the reply as HTML. |
header.indexOf("GET /26/on") | Searches the request for a URL. indexOf returns a position or -1, so >= 0 means "the browser asked for this". |
client.stop() | Closes the connection. Connection: close warned the browser, so it does not wait for more. |
timeoutTime | Guards against a client that connects then goes silent, so one browser cannot hang the loop forever. |
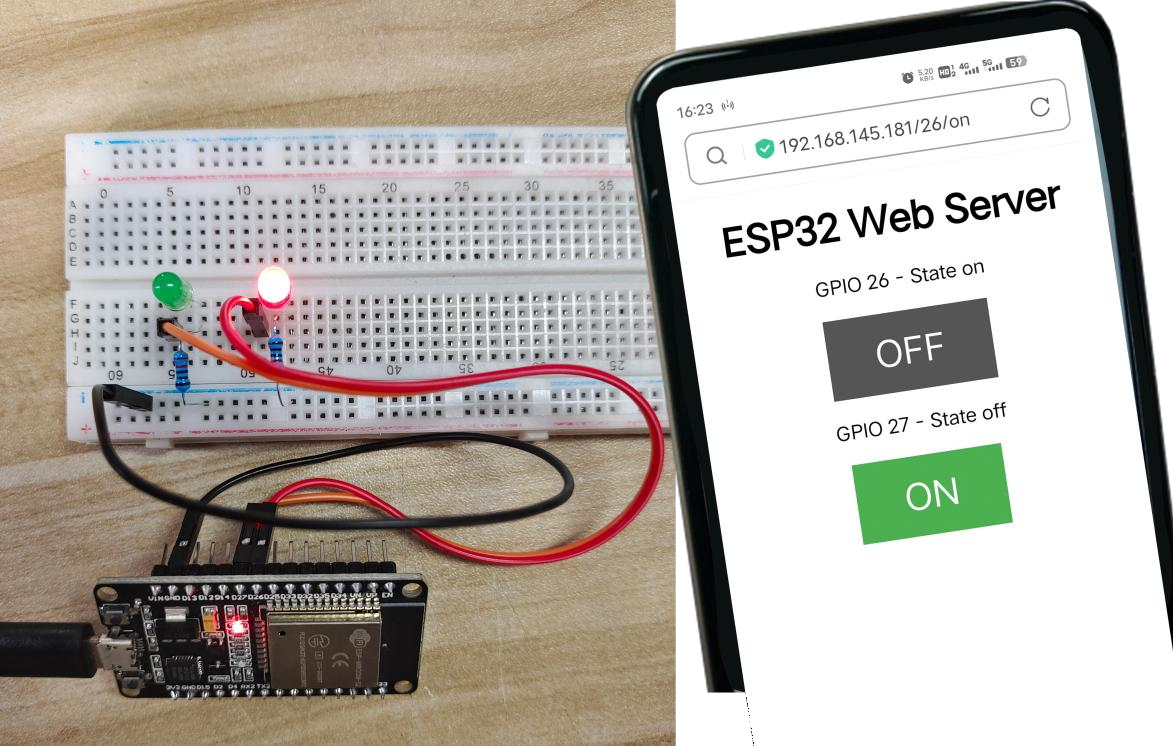
7 · Demonstration
8 · Wrapping Up: What You've Learned
Your board is now a server: something other devices connect to. That is the step that turns a microcontroller project into an Internet of Things project.
- The ESP32 joins a normal 2.4 GHz network with
WiFi.begin()and gets an IP from the router. It cannot see 5 GHz networks at all. - A web server waits on a port (80 for HTTP) and answers requests;
server.available()hands you a client when a browser connects. - HTTP is just text: a request is lines ended by a blank line, a response is a status line, headers, a blank line, then the page.
- The URL carries the command. Links like
/26/onare how the browser tells the board what to do. - The ESP32 builds the HTML itself and includes the current state, so the page always shows what the board believes.
- The board keeps its own state variables because it cannot read back what an output is doing. Project 8 shows what happens when a physical button changes that state behind the page's back.
9 · Troubleshooting
| Symptom | Likely cause | Fix |
|---|---|---|
| Stuck on "Connecting…" dots | Wrong credentials / 5 GHz network | Fix SSID+password; use 2.4 GHz |
| Page won't load | Phone on a different network | Same LAN for phone + ESP32 |
| LED reversed | Polarity | Long leg toward the 220 Ω side |
| Monitor blank | Wrong baud | Set it to 115200 |